Okay, let’s talk about keeping your electric scooter dry! We all know that feeling when you’re caught in a sudden downpour, and your scooter is suddenly less «zoom» and more «zooooom… wait, is that smoke?». So, let’s dive into different levels of moisture protection. You’ve got your IPX ratings – these numbers tell you how waterproof something is. An IPXONE rating means it’s protected from dripping water, while IPXSEVEN means it can handle immersion in water. Your scooter likely won’t have an IPXSEVEN rating, but understanding these ratings helps you manage expectations. Don’t expect to take your scooter for a submarine ride!
Now, let’s talk about riding in less-than-ideal weather. Common sense is key here. Avoid puddles – seriously, avoid them. Deep water can short-circuit your scooter’s electronics, and that’s a costly repair. If you see standing water, find an alternative route. Also, be aware of reduced traction on wet surfaces. Slow down, and be extra cautious when cornering. Remember, safety first! And if you’re riding in heavy rain, consider whether it’s even worth the risk. Sometimes, it’s better to wait it out.
So, what happens if water does get inside your scooter? First, don’t panic! Immediately turn off your scooter and let it dry completely. Don’t try to power it on until it’s fully dry. This could cause serious damage. If you’ve been riding through deep water, you might need to carefully inspect your scooter for any visible damage. Look for any signs of corrosion or water damage. If you see anything concerning, it’s best to take it to a professional for repair. Don’t attempt to fix it yourself unless you’re experienced with electric scooter mechanics.
Now, let’s get into the fun part: waterproofing your scooter yourself! This isn’t about making it completely submersible, but about adding extra protection against splashes and light rain. The key is sealing potential entry points. We’ll focus on general sealing techniques, then look at specific areas like the motor-wheel and deck.
General sealing involves using waterproof sealant, like silicone sealant. This is a relatively inexpensive and readily available product. Before you start, make sure your scooter is completely clean and dry. Carefully inspect all seams, joints, and cable entries for any gaps or openings. Apply a thin, even bead of sealant to these areas, ensuring complete coverage. Let the sealant cure completely according to the manufacturer’s instructions – this usually takes several hours, sometimes even overnight. Remember, patience is key here. A rushed job will likely lead to leaks.
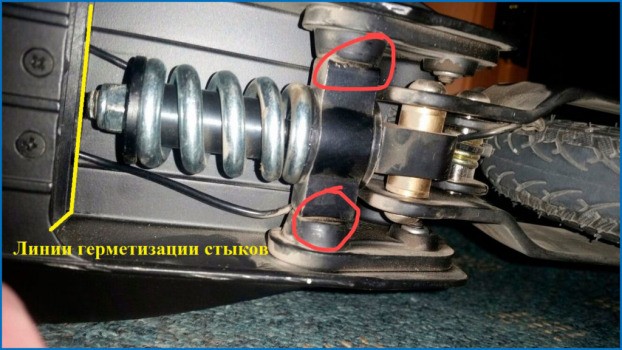
Let’s talk about the motor-wheel. This is a crucial component, and water ingress here can be particularly damaging. Carefully inspect the area where the wheel connects to the scooter’s body. Look for any gaps or openings where water could enter. Apply sealant to these areas, paying close attention to the cable entry points. You might also consider using waterproof electrical tape to further protect any exposed wires. Remember, multiple layers of protection are better than one.
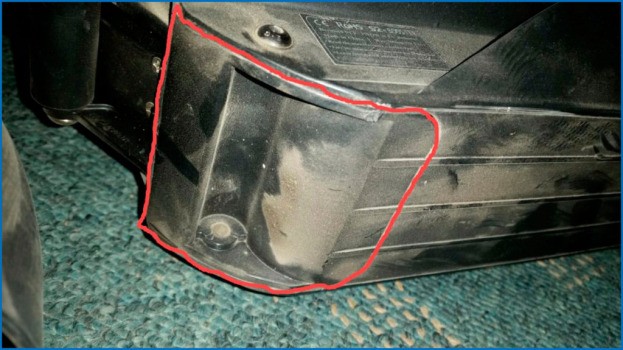
Finally, let’s address the deck. The deck is often overlooked, but it can also be a source of water ingress. Check for any gaps or openings around the edges of the deck. Apply sealant to these areas, ensuring a complete seal. If your scooter has any exposed screws, consider adding a dab of sealant around them to prevent water from seeping in. Remember, a little extra sealant is better than not enough. By taking these steps, you can significantly improve your scooter’s resistance to water damage, extending its lifespan and keeping you riding, rain or shine.
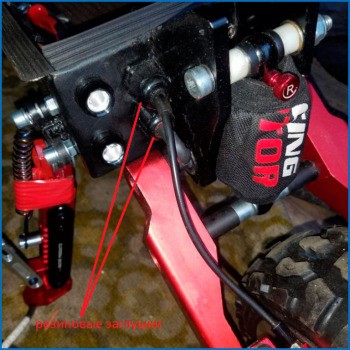
Okay, let’s dive right into waterproofing your electric scooter. First up, we’re tackling the wiring. This is arguably the most crucial part, because exposed wires are a recipe for disaster when it comes to water damage. We need to ensure every single connection is properly sealed. I recommend using heat-shrink tubing on all your wire splices – it’s cheap, readily available, and incredibly effective. Make sure you overlap the tubing generously, and use a heat gun to shrink it tightly around the connection. Don’t skimp on this step! For added protection, consider coating the entire wiring harness with a conformal coating spray. This creates a protective layer that repels water and prevents corrosion. Remember to let it dry completely before moving on. We’re aiming for a completely sealed system here, so pay close attention to detail. Don’t forget to check all your connectors – make sure they’re securely fastened and free of any gaps.
Next, let’s talk about covers. Factory covers are often flimsy and inadequate for serious waterproofing. We’re going to upgrade those. You can find replacement covers made from more durable, waterproof materials online. Look for silicone or neoprene options – they’re designed to withstand the elements. When installing these new covers, make sure they fit snugly and completely cover any exposed components. If you can’t find pre-made covers, you can always make your own using waterproof fabrics and some basic sewing skills. Just remember to reinforce any seams with waterproof sealant. A little extra effort here goes a long way in protecting your scooter.
- Читайте также:
Now, let’s move on to the box elements. Many electric scooters have various boxes housing components like controllers and other electronics. These boxes often have gaps or poorly sealed seams. We need to address this. A good quality silicone sealant is your best friend here. Carefully apply it to any seams or gaps you find, ensuring a complete seal. You can also use weather stripping around the edges of the boxes for an extra layer of protection. Remember, we’re aiming for a completely airtight seal to keep water out. Take your time and be thorough. Don’t rush this step; a poorly sealed box can lead to significant damage.
The box for electric storage is another critical area. This is where your battery and other sensitive electronics reside. If water gets in here, you’re looking at a potentially expensive repair. Again, silicone sealant is your go-to solution. Seal all seams and gaps meticulously. You might also consider adding a layer of waterproof tape over the sealant for extra security. If your box isn’t already waterproof, you might even consider replacing it with a completely waterproof enclosure. This is a more involved process, but it offers the best protection.
Moving on to the boards. The deck of your scooter is often exposed to the elements. While it might be made of waterproof material, water can still seep into crevices and cause damage over time. Consider applying a layer of waterproof sealant to the underside of the deck, particularly around any screw holes or seams. This will create a barrier against water intrusion. You can also use a waterproof spray coating for added protection. This is a preventative measure, but it’s a worthwhile one.
Now, let’s address the on-board computer and lights. These are usually housed in relatively sealed units, but it’s still a good idea to add an extra layer of protection. Apply a thin layer of silicone sealant around the edges of these units to prevent water from seeping in. For the lights, consider using waterproof LED replacements if your originals aren’t already waterproof. These are readily available and offer superior protection against water damage. This is a relatively simple upgrade that provides significant peace of mind.
Finally, we’ll discuss rubber gaskets. Many components on your scooter rely on rubber gaskets for sealing. Over time, these gaskets can degrade and lose their effectiveness. Inspect all your gaskets carefully. If you find any that are cracked, damaged, or worn, replace them immediately. These are inexpensive parts, and replacing them is a simple yet highly effective way to improve your scooter’s waterproofing. Don’t underestimate the importance of these seemingly small components. They play a significant role in keeping your scooter dry and functional.